Molasses Spice Cookies

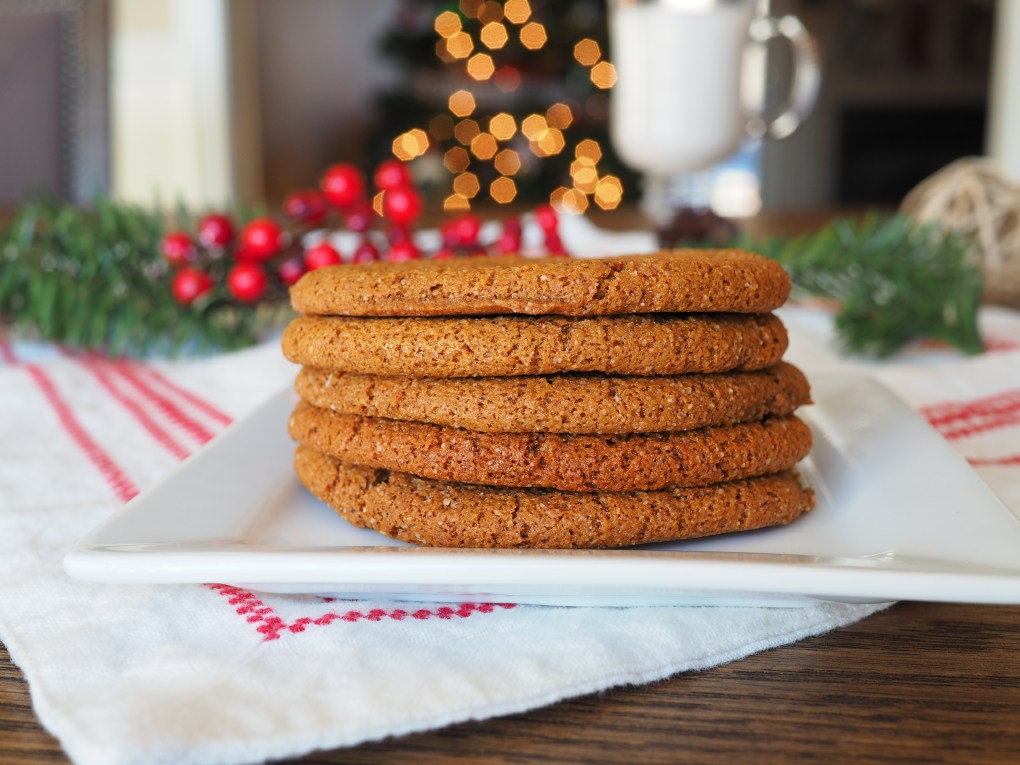
Iron-rich molasses, heaps of anti-inflammatory spices, and protein from almond butter make this cookie a reasonable, yet sweet, holiday treat. Growing up, my mom’s famous molasses cookies were an unspoken part of every Christmas. This recipe was an easy one to re-invent, using my Sneaky Snickerdoodles as a starting point, simply swapping out the maple syrup for molasses and tossing in a few more spices. The result is crispy on the outside, gooey on the inside, and now a new part of my Christmas!

OLYMPUS DIGITAL CAMERA

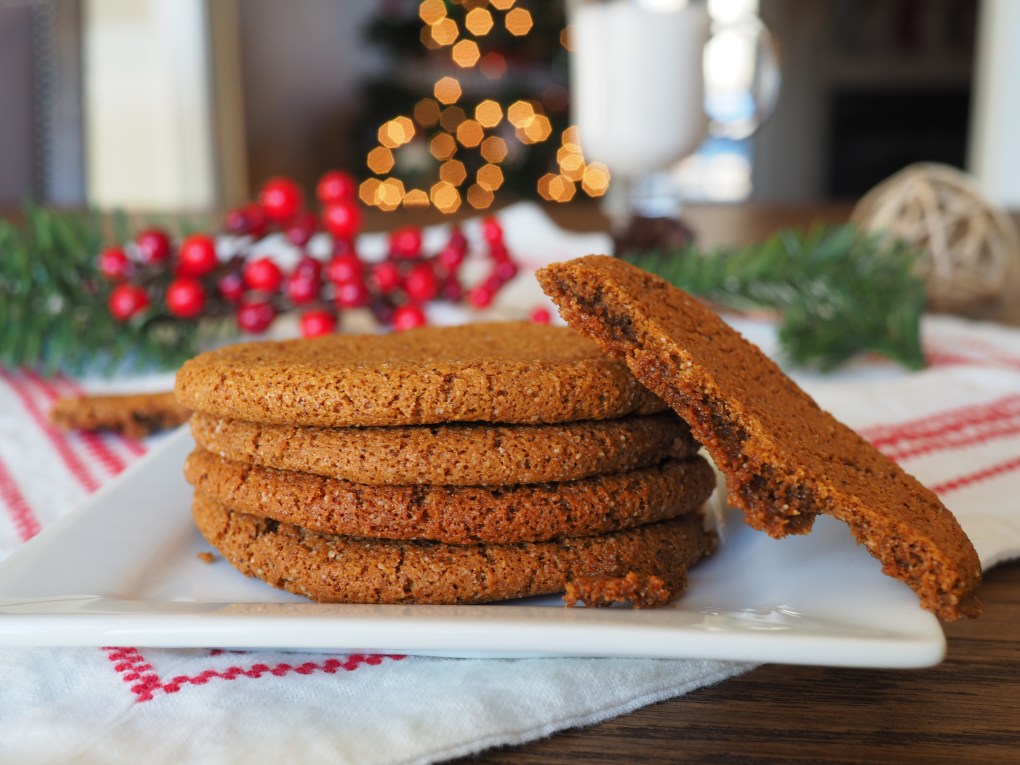
Although molasses isn’t considered a refined sugar or among the “white devils” it still contributes a fair amount of sugar in these cookies. They are sweet enough without frosting, but if you are serving these to anyone with a hole in their sweet tooth, this egg nog buttercream frosting is a delicious addition. These no longer keep the cookie dairy-free or refined sugar-free, but it does make it look festive!

OLYMPUS DIGITAL CAMERA

Egg Nog Buttercream Frosting (Optional)

  • 1/4 cup butter, melted
  • 2 cups powered sugar
  • 2 teaspoons egg nog
  • Dash nutmeg

Mix all together in a mixer until sugar is dissolved and frosting looks glossy. Spread a thin even layer on top of cookies and sprinkle a dusting of nutmeg to decorate.

Molasses Spice Cookies

  • Servings: 18 cookies
  • Difficulty: Easy
  • Print

Ingredients

Molasses Spice Cookie Ingredients

  • 2 1/2 cups almond flour or almond meal
  • 3/4 cup molasses
  • 1/2 cup almond butter*
  • 2 teaspoons cinnamon
  • 1 teaspoon cloves
  • 1 teaspoon ground ginger
  • 1/2 teaspoon all-spice
  • 1 Tbsp coconut oil
  • 1 tsp baking soda
  • 1/2 tsp sea salt

*Runny almond butter is best! A jar is usually the runniest when newly opened. If you’re scraping the bottom of the barrel on your almond butter, add an additional 1-2 teaspoons of coconut oil to the recipe.

Directions

Preheat oven to 350 degrees and line a cookie sheet with parchment paper. In a large mixing bowl or stand mixer bowl, add all ingredients in the order given. Mix just until all ingredients are incorporated.

Scoop 1 inch round balls of dough onto prepared cookie sheet. You may choose to roll them in your hands or use a cookie dough scoop for more consistency. Using the bottom of a glass jar or cup, flatten the balls into round cookies, about 1/4″ thick.

Bake for approximately 10 minutes. If you like a gooier cookie, pull them out sooner, around 8 minutes. Transfer to a wire wrack to cool completely. Store them in a tightly sealed container for up to a week in the refrigerator or 3-6 months in the freezer.

Photos and Content Copyright © Jaclyn Beaty Nutrition, 2019


Orange Dreamsicle Smoothie

If I told you the truth that this smoothie was inspired by my daughter’s leftover frozen babyfood, promise me you won’t hit Back on your browser?  I had loads of left over frozen butternut squash puree that I threw into a smoothie one day. The result was creamy, flavorful, and glycemic-balanced with a flavor reminiscent of the Schwann’s man push pops from the 90s (are those still a thing?). To me, it’s not a smoothie if it doesn’t have a veggie. I’ve used both the butternut squash cubes from the natural foods freezer and the spirals found in the main freezer section. The mild taste of butternut squash blends right in to the creamy orange flavor, but I encourage you to experiment with your favorite brightly colored fruits and veggies:

Yellow/orange vegetables: butternut squash, acorn squash, pumpkin, sweet potatoes, carrots

Yellow/orange fruits: peaches, bananas, mangos, papaya, cantaloupe, oranges, clementines, pineapple, lemon

OLYMPUS DIGITAL CAMERA

Orange Dreamsicle Smoothie

Orange produce is usually loaded with Beta Carotene, a pre-courser to Vitamin A. Your body burns through Vitamin A during times of illness (don’t believe me? test your night vision next time you’re sick!). Vitamin A is ONLY found in animal products. You may be thinking, “wait, I thought my canned pumpkin said 130% of vitamin A?” That label is assuming that under the perfect circumstances, with the perfect genetics, with the perfect nutritional mechanisms, you COULD convert the amount of Beta Carotene in that can of pumpkin into that much Vitamin A.  Most of our bodies aren’t walking around in a state of nutritional perfection though, so we aren’t getting what that label promises.  All the more reason to get daily sources of rich orange/yellow produce in the diet.

Orange Dreamsicle Smoothie

  • Servings: Four, 8oz servings
  • Difficulty: Easy
  • Print

Ingredients

Orange Dreamsicle Smoothie

  • 1  cup non-dairy milk of choice (almond, coconut, or oat milk)
  • 1/2 cup orange juice (or 2 Tbsp of frozen OJ concentrate)
  • 2 large oranges, peeled, or 4 small clementines/Cuties
  • 2 ripe bananas
  • 1/2 teaspoon vanilla
  • 2 Tbsp coconut oil
  • 3 Tbsp seeds of choice (hemp hearts, chia seeds, or flaxseeds)
  • 1 cup cooked or frozen butternut squash
  • 1 cup frozen mangoes
  • Small handful of red raspberries (see note)**

Optional: add a scoop of collagen powder or this Vega Tropical Tango Smoothie powder for bonus protein. I don’t use protein powders with my kids, so we’ve settled on protein coming from the hemp seeds in the recipe above.

**Adding just a few raspberries enhances the color, taking it from a dull yellow to a bright orange. It’s an optional step, but an aesthetic one that helps picky eaters who eat with their eyes first. About 5-7 red raspberries is enough to do the trick!

Directions

Add all ingredients in the order given and blend! Remember all frozen food should always go last into your blender for the best blending.

Refrigerate left overs in sealed glass jars for up to 3 days or freeze for up to 3-6 months.

Photos and Content Copyright © Jaclyn Beaty Nutrition, 2019


Salmon Chowder

OLYMPUS DIGITAL CAMERA

OLYMPUS DIGITAL CAMERA

The first chill in the air means chowder on the stove. The is a perfect dinner for cold nights, and it makes a lot so we’re always able to invite an extra guest to our table. It’s creamy, flavorful, and hearty. Canned salmon can be replaced with fresh filet, however it’s so easy to find wild-caught Alaskan salmon on the shelves that it’s hard to pass up the convenience and cost of canned.

Salmon Chowder

  • Servings: 12 Servings
  • Difficulty: Easy
  • Print

Ingredients

Salmon Chowder

  • 3 Tablespoons olive oil
  • 1 cup chopped onion
  • 1/2 cup chopped celery
  • 3 garlic cloves, minced
  • 2 cups diced white potatoes
  • 3 carrots, diced
  • 3 cups chicken broth
  • 1 teaspoon salt
  • 1/2 teaspoon ground black pepper
  • 1 teaspoon dried dill weed
  • 2 (16 ounce) cans salmon, drained
  • 1 (15 ounce) can full-fat coconut milk
  • 1 (15 ounce) can creamed corn
  • Shredded cheddar cheese (optional, otherwise the chowder is dairy free)

Directions

Melt butter in a large pot or dutch oven over medium-high heat. Saute onion, celery, and garlic until translucent and tender. Stir in broth, potatoes, carrots, salt, pepper, and dill. Bring to a boil and reduce heat. Cover and simmer for 20 minutes.

Once potatoes and carrots are soft, stir in both cans of drained salmon, breaking apart large pieces. Add in coconut milk and creamed corn. Top with cheese if desired.

Serve with green salad and corn bread for a delicious filling winter dinner!

Photos and Content Copyright © Jaclyn Beaty Nutrition, 2019


Eating for Iron-Clad Immunity

OLYMPUS DIGITAL CAMERA
While washing your hands is the single most effective thing you can do to keep from getting sick, the powers we behold on the end of the fork can also make a huge impact on immunity. The foods that fuel our body can be the difference between an iron-clad immune system or a winter trapped in bed. Defend yourself against colds and flu this year with these immune-boosting medicinal foods:

  • Garlic– Small but mighty, garlic is nature’s best display of “food as medicine.” Its potent medicinal properties will battle anything from colds, flu, viruses, or infections. Two raw garlic cloves have the same antibacterial strength as one dose of antibiotics, but without the gut-harming effects antibiotics can leave. Garlic contains strong antioxidants that have been found to affect immune responses in the blood and have broad-spectrum antimicrobial properties.
    • Garlic Rx: Chew one raw chopped garlic and a spoonful of honey at the first sign of a tickle. The key is that the garlic must be chopped first, then let it sit for 10 minutes. Letting it sit will activate the germ-fighting compounds that make it the safest and most effective magic pill against illness. When paired with honey, not only does it make it more palatable, but honey alone acts as an antimicrobial (antiviral and antibacterial), and antioxidant. These two powerhouses to work synergistically and fight whatever stands in its way. It may taste potent, but it’s effective!
  • Elderberries- Research shows elderberries prevent viruses from attacking healthy cells in the lining of the nose and throat. When taken before an infection, it can stop the virus in its tracks. When taken after an infection, it can reduce the duration of the illness in half (think 3 days rather than 6).  Elderberries are packed with antioxidants, especially immune-boosting vitamin C and taste great too!
    • Elderberry Rx: Elderberry syrup, or Sambucus, can be purchased in most grocery or health food stores however making your own from dried black elderberries can save money.  Follow the label on the product, usually increasing the amount and frequency of the syrup until an illness has passed.
  • Turmeric- Curcumin, the bright yellow component that gives turmeric its signature color, is highly anti-inflammatory. When inflammation is down, the immune system is up. Its antimicrobial properties can target respiratory infections like bronchitis, influenza, and coughs. Turmeric also acts as a natural pain killer to help ease body aches from illness.
    • Turmeric Rx: Warm up to a mug of turmeric tea, also called golden milk, for a simple and effective cure-all. Simmer 1-2 cups of water or almond milk, adding in 1 teaspoon each of turmeric, cinnamon, and ginger. Add honey to sweeten and enjoy warm!
  • Bone broth- As one of the most nutrient-dense sources of vitamins, minerals, and electrolytes, bone broth is an ideal cold and flu remedy.  Bones and tissues of chicken, cow, or pork, are simmered and broken down leaving behind a great source of amino acids and gut-healing collagen to speed recovery.
    • Bone broth Rx: Pre-made broth can be purchased in most grocery stores but it’s also easy to make your own at home. Use 3-4 pounds of organic bones in just enough water to cover bones. Add vegetables like onions, garlic, celery, and carrots plus a tablespoon of apple cider vinegar to help break down the bones. Simmer for 12-24 hours or until bones are soft and can easily be broken. Strain through a fine mesh strainer. Enjoy a warm cup of the rich broth that remains, use it as a base for soup, or opt for the broth as the liquid used to cook grains like rice or quinoa.
  • Sauerkraut- Gut health plays a large part in immunity, and fermented foods provide probiotics to strengthen the digestive tract. Probiotics, or healthy bacteria, have been shown to lower your chances of getting a cold and reduce the severity of an illness if you do get sick. Sauerkraut is a superfood loaded with healthy probiotics and vitamin C, a one-two punch for warding off illness.
    • Sauerkraut Rx: Skip the pasteurized store-bought sauerkraut found in the center aisles. Most of the beneficial bugs have been lost during the high-heat pasteurization process and likely contain preservatives and sugar. Instead, buy sauerkraut from the refrigerated section or make your own using only two ingredients. Shred one head of purple cabbage as thinly as your knife allows and sprinkle with 2 tablespoons of sea salt. Knead for 10 minutes to draw out juices and pack in glass jars, ensuring enough juice covers cabbage. Seal tightly and let sit covered in a warm dark place for 2-4 weeks to ferment.  

Stock your pantry with these powerhouses and layer these foods within a low-sugar diet. Vitamin C and sugar compete for uptake, so the more sugar we eat, the less vitamin C we can absorb. Choose a variety of brightly colored fruits and vegetables daily to offer the best nutrients needed to ward off sickness. Let food be thy medicine as you eat for strong immunity this winter.

Photos and Content Copyright © Jaclyn Beaty Nutrition, 2020


Chocolate Chip Pumpkin Blender Muffins

My first job out of college involved going on a local TV segment to talk about nutrition and fitness. I paired up with my coworker who was a dietitian, and every month, we would do back to back segments on health. It was on the set of this local talk show my coworker first introduced me to chocolate chip pumpkin muffins. I thought they were brilliant. That was also 15 years ago before the buzz of gluten free, dairy free, and healthy fat hit mainstream. I’ve reinvented that recipe with a modern take on healthy ingredients, and I continue to think they are brilliant. I hope you do too!

OLYMPUS DIGITAL CAMERA

Using a high speed blender for these muffins results in a perfectly moist, rich, and flavorful muffin every time, plus a relatively easy clean up! Muffins can be a junk food or a health food, and I like to place these in the later category. Pumpkin supplies a healthy dose of beta carotene from the rich orange color, which converts to vitamin A, a must for good night vision. The almond butter is the best choice for nut free butters in these and gives a healthy dose of protein and fat. These are gluten free, oil free, and dairy free (as long as you use dairy free chocolate chips!).

OLYMPUS DIGITAL CAMERAIf you are sensitive to gluten or have celiac, make sure you use certified gluten free oats. Oats are naturally gluten free, but since most of them are processed in factories that process other gluten containing grains, it often contaminates it.


Chocolate Chip Pumpkin Muffins

  • Servings: 12 Muffins
  • Difficulty: Easy
  • Print

Ingredients

Chocolate Chip Pumpkin Blender Muffins

  • 1 1/4 cup Libby’s pumpkin puree
  • 2 eggs
  • 1/3 cup pure maple syrup
  • 1/4 cup dairy free milk of choice (I prefer coconut or oat milk)
  • 1/3 cup almond butter
  • 1 teaspoon vanilla
  • 2 1/4 cups old fashioned rolled oats
  • 1 teaspoon baking powder
  • 1/2 teaspoon baking soda
  • 1/2 tsp sea salt
  • 1 cup mini chocolate chips, divided

Directions

Preheat oven to 350 F and spray muffin tins with non-stick cooking spray. In a high speed blender, mix all ingredients in the order given. Blend until well incorporated. Add 1/2 cup of chocolate chips into the batter and pulse just long enough to incorporate.

Scoop batter into prepared muffin tins 3/4 full. Sprinkle tops with remaining chocolate chips and put muffin tray into oven. Bake for 20 minutes or until a toothpick is inserted and comes out clean. Let cool for 3-5 minutes before transferring to a cooling rack. Store tightly sealed in the refrigerator for up to 5 days.

*Note: Fresh almond butter tends to be runnier and works better in this recipe. I don’t suggest substituting with other nut butters, especially peanut butter. If you are using the bottom of the jar of almond butter which can be dry or flaky, add a teaspoon of coconut oil to the recipe for an even consistency.

Photos and Content Copyright © Jaclyn Beaty Nutrition, 2019


Double Chocolate Blender Muffins

My high speed blender has become a permanent fixture in my kitchen. Between my daily smoothie, soups, baby food, pancake batter, and now THESE BLENDER MUFFINS, it’s not going anywhere anytime soon.

OLYMPUS DIGITAL CAMERA

Cocoa is among the world’s top superfoods and when I have the chance to disguise antioxidant dense foods in the form of sweets, I tell myself it’s all in the name of good nutrition. Cocoa is high in magnesium, iron, fiber, and is one of the richest sources of pholyphenols, the antioxidants that give cocoa the anti-inflammatory and cardiovascular health benefits.

These muffins are gluten free, and if you are sensitive to gluten or have celiac, make sure you use certified gluten free oats. Oats are naturally gluten free, but since most of them are processed in factories that process other gluten containing grains, it often contaminates it.

Double Chocolate Muffins

  • Servings: 12 Muffins
  • Difficulty: Easy
  • Print

Ingredients

Double Chocolate Blender Muffins

  • 2 medium ripe bananas* (see note!)
  • 2 eggs
  • 1/2 cup full-fat Greek yogurt
  • 1/3 cup maple syrup
  • 1 teaspoon vanilla
  • 2 cups old fashioned rolled oats
  • 1/2 cup non-alkalized unsweetened cocoa powder (I like Navitas Organic Cacao powder)
  • 1 1/2 teaspoon baking powder
  • 1/2 teaspoon baking soda
  • 1/2 tsp sea salt
  • 1/2 cup mini chocolate chips, divided

Directions

Preheat oven to 350 F and spray muffin tins with non-stick cooking spray. In a high speed blender, mix all ingredients in the order given. Blend until well incorporated. Add 1/4 cup of chocolate chips into the batter and pulse long enough to incorporate.

Scoop batter into prepared muffin tins 3/4 full. Sprinkle tops with remaining chocolate chips and put muffin tray into oven. Bake for 15 minutes until a toothpick is inserted and comes out clean. Let cool for 3-5 minutes before transferring to a cooling rack. Store refrigerated for up to 5 days.

*Note: Much of the sweetness comes from the ripe bananas. If you are too impatient to let your bananas ripen and wish to use bananas on the green side, increase the amount of maple syrup or honey you add by 1/4 cup. I have used frozen bananas, simply blending longer, and they turned out just as good.

Photos and Content Copyright © Jaclyn Beaty Nutrition, 2019


Rustic Mulberry Muffins

I grew up with mulberry trees in our yard, and it was always a race to pick the juicy berries before the deer ate them. I now make excuses to play at our closest park and ironically come home with a Tupperware full of mulberries. Few people know about it, and many stop to ask what we are picking. I refer to them as the acai berry of the mid-west because of their mighty antioxidant power and super food status.

OLYMPUS DIGITAL CAMERA
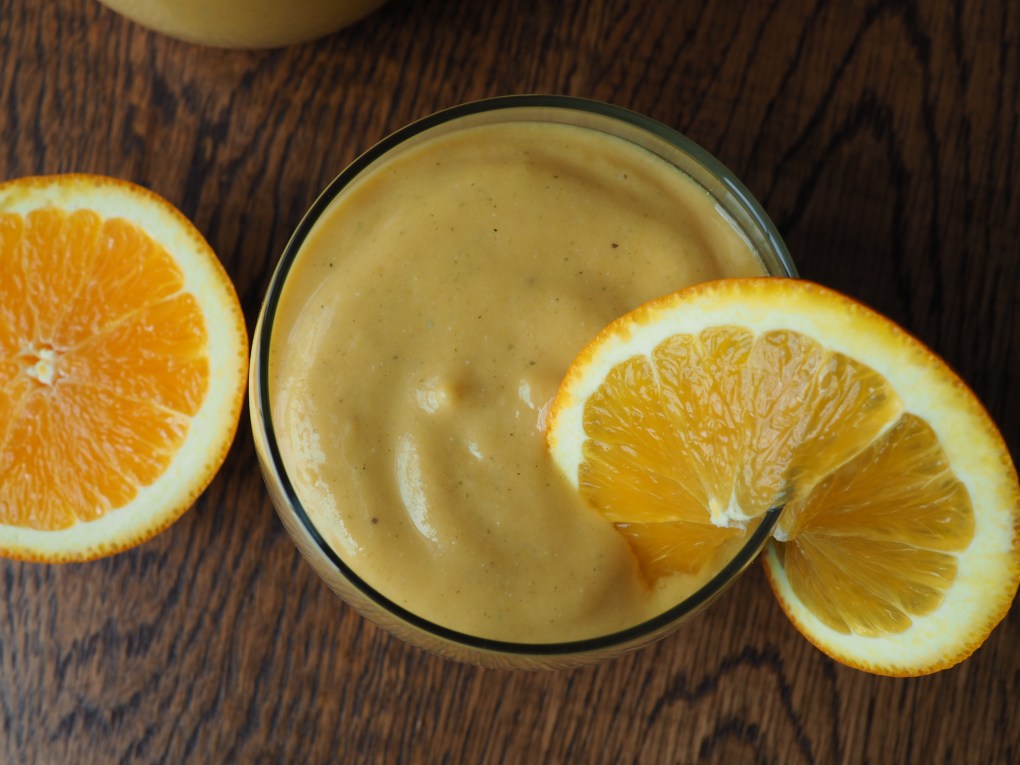
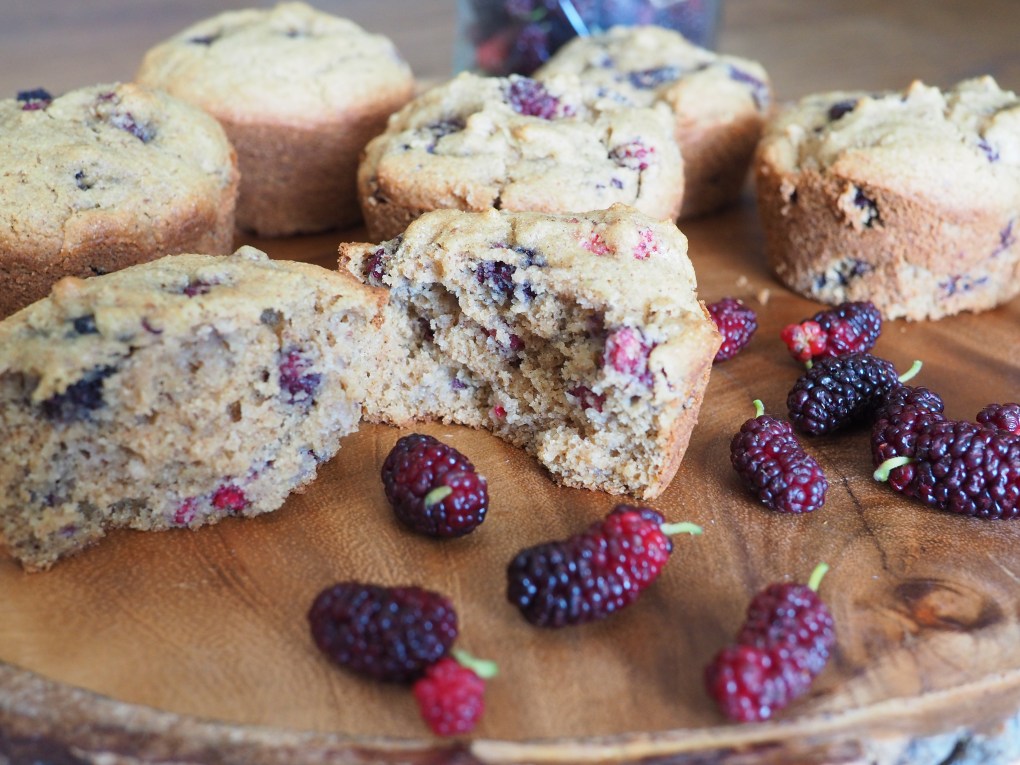
Although this recipe is truly a great one, getting your hands on mulberries can be a challenge, so simply replace the 2 cups of mulberries in this recipes with your favorite berry or fruit. Fresh mulberries are a rare find in a grocery store, but dried ones are more common. I haven’t made this recipe using dried mulberries, so I can’t speak to the outcome.

Mulberries aren’t as sweet as many other berries, but have an earthier, milder sweetness similar to a fig. They’re rich in anthocyanins, the phytochemical that gives them the deep purple color. The maple syrup in these muffins contribute just enough sweetness to compliment the tartness in the berries, and I find these to be a perfect “sweet enough” treat.OLYMPUS DIGITAL CAMERA

These muffins are gluten free, and use chickpea flour which is one of my favorite GF flours to use. It’s one of the most inexpensive GF flours on the market, and it’s also not as gritty as others.

Rustic Mulberry Muffins

  • Servings: 12 Muffins
  • Difficulty: Moderate
  • Print

Ingredients

Rustic Mulberry Muffins

  • 3/4 cup brown rice flour
  • 1 cup of chickpea flour
  • 1 tablespoon flaxseed
  • 2 tsp cinnamon
  • 1 tsp baking powder
  • 1 tsp baking soda
  • 1/2 tsp sea salt
  • 3/4 cup maple syrup
  • 1/2 cup unsweetened applesauce
  • 1/3 cup water
  • 1/4 cup coconut oil
  • 1 tablespoon apple cider vinegar
  • 1 tsp vanilla
  • 2 cups fresh mulberries, stems removed

Directions

Preheat oven to 350 F and spray muffin tins with non-stick cooking spray. In a medium bowl, mix together brown rice flour, chickpea flour, flaxseed, cinnamon, baking powder, baking soda, and sea salt.

In a stand mixer bowl or blender, combine maple syrup, apple sauce, water, coconut oil, vinegar, and vanilla. Mix at low speed until incorporated. Pour dry ingredients into wet ingredients and combine until well mixed. Add mulberries last and fold in. Scoop batter into prepared muffin tins 3/4 full and put muffin tray into oven. Bake for 20-25 minutes until a toothpick is inserted and comes out clean. Let cool for 3-5 minutes before transferring to a cooling rack.

Photos and Content Copyright © Jaclyn Beaty Nutrition, 2019


Key Lime Avocado Mousse

This is one of the most deliciously sweet ways I could possibly think to eat avocado. My family went on a key lime pie hummus kick for a while, but the chickpeas just weren’t doing it for me anymore. I have a delicious chocolate avocado mousse recipe but I explored the realm of the true green avocado color and created a mouth-watering and guilt-free treat. The healthy fats and natural sweetness from avocado and coconut butter crowd out unnecessary sugar. Top with shredded coconut flakes, graham cracker crumbs, coconut chips, lime zest, or white chocolate. You can’t go wrong!

OLYMPUS DIGITAL CAMERA

Load up a ramekin or small mason jar for a perfect portion and chill these before serving. The acidity from the lime juice will keep the avocado from turning brown so they are a perfect make-ahead dessert for company.

OLYMPUS DIGITAL CAMERA

Key Lime Avocado Mousse

  • Servings: Four, 4oz servings
  • Difficulty: Easy
  • Print

Ingredients

Key Lime Avocado Mousse

  • 2 large or 3 small avocados
  • Zest, juice, and pulp of 1 whole lime (approx 2 Tbsp lime juice, 1-2 tsp grated zest)
  • 2 Tbsp coconut butter
  • 2 Tbsp coconut milk
  • 2 Tbsp maple syrup
  • 1 tsp vanilla
  • Coconut flakes for topping (optional)

Directions

Zest the rind of 1 lime, saving aside approximately 2 teaspoons of grated lime zest. In a food processor, add the flesh from the avocado, pulp and juice from what remains of the lime, coconut butter, coconut milk, maple syrup, and vanilla. Blend until a smooth and whipped consistency is achieved.

Pour mousse into single-serving dishes and top with grated lime zest and coconut flakes. Chill approximately 3 hours before serving, as this will give the mousse a firmer texture. Keep refrigerated for up to 4 days.

Photos and Content Copyright © Jaclyn Beaty Nutrition, 2019


Strawberry Pineapple Popsicles

It’s only May, but the summer heat is around to stay in Tennessee and my family is soaking up every ray of sunshine we can get. The transition from spring to summer means the berry fields are ripe for the picking and coincidentally, that popsicles become perfectly acceptable for snack time. One of my favorite ways to use strawberries is in my Strawberry Banana Detox Smoothie and Strawberry Quinoa Pancakes but getting covered in sticky, melty popsicle juice is quintessentially a summer must.

OLYMPUS DIGITAL CAMERA

I follow the Environmental Working Group’s Clean 15 and Dirty Dozen lists when choosing to buy organic. Strawberries have topped the charts for the last 3 consecutive years as the #1 most highly sprayed crop in America. Most strawberries tested contain at least 20 different chemicals (some up to 40!) a few of them even being known carcinogens. For that reason, I will always choose to buy organic strawberries and also choose to drive a little farther to pick from the berry fields that don’t spray. I know there is no stopping a toddler from eating straight from the plant, but knowing that a farm doesn’t spray allows me the peace of mind when I see my kid eating his weight in berries straight from the patch. This was his bucket after an hour in the field. So much for my field hand! IMG_20190508_105351491

These popsicles take literally zero culinary expertise and can be customized to virtually any fruit and sweetened up or down to your taste preferences. I like to add chia seeds to mine for a quick dose of healthy fats and mucilaginous fiber for gut health. I also choose to blend full-fat coconut milk into both layers of fruit so the kiddos are getting more than simple fructose into their blood stream.

OLYMPUS DIGITAL CAMERA

Strawberry Pineapple Popsicles

  • Servings: Eight, 4oz servings
  • Difficulty: Easy
  • Print

Ingredients

Strawberry Pineapple Popsicles

  • 1 cup full-fat coconut milk, divided
  • 1 cup fresh or frozen strawberries
  • 3 Tbsp chia seeds
  • 1 cup fresh or frozen pineapple
  • Honey (optional)

Directions

In a food processor, add the strawberries (or other fruit of choice), a half a cup of coconut milk and the chia seeds. I only add chia seeds to one of the two layers, and chose to add it to the strawberries since they are naturally seedy. Pulse until just blended, leaving some bigger bits of berry. You may wish to add a teaspoon of honey into each blend if you are aiming for a sweeter pop, but I find the natural sweetness of the berries and pineapple perfect as is! Pour into a bowl and set aside. You may wish to give your food processor a quick rinse before blending the pineapple so the colors don’t run, but it’s not necessary.

For the second layer, blend the pineapple and half a cup of coconut milk until smooth. Alternate layers into popsicle molds filling each mold one-third of the way, alternating layers with fruit blends. Freeze for at least 3 hours or until set and keep frozen until ready to enjoy!

Photos and Content Copyright © Jaclyn Beaty Nutrition, 2019


Chocolate Peanut Butter Smoothie

One of the first thoughts I usually have each morning is what I get to eat for breakfast. Sometimes this is my only motivation to actually roll out of bed. This smoothie is for those days when your head tells you to eat healthfully, but your heart says it prefers indulging on something decadent. The PB and chocolate combo is a match made in culinary heaven, and feeling good about consuming it first thing in the morning makes this a no-brainer. Am I alone in this?OLYMPUS DIGITAL CAMERA
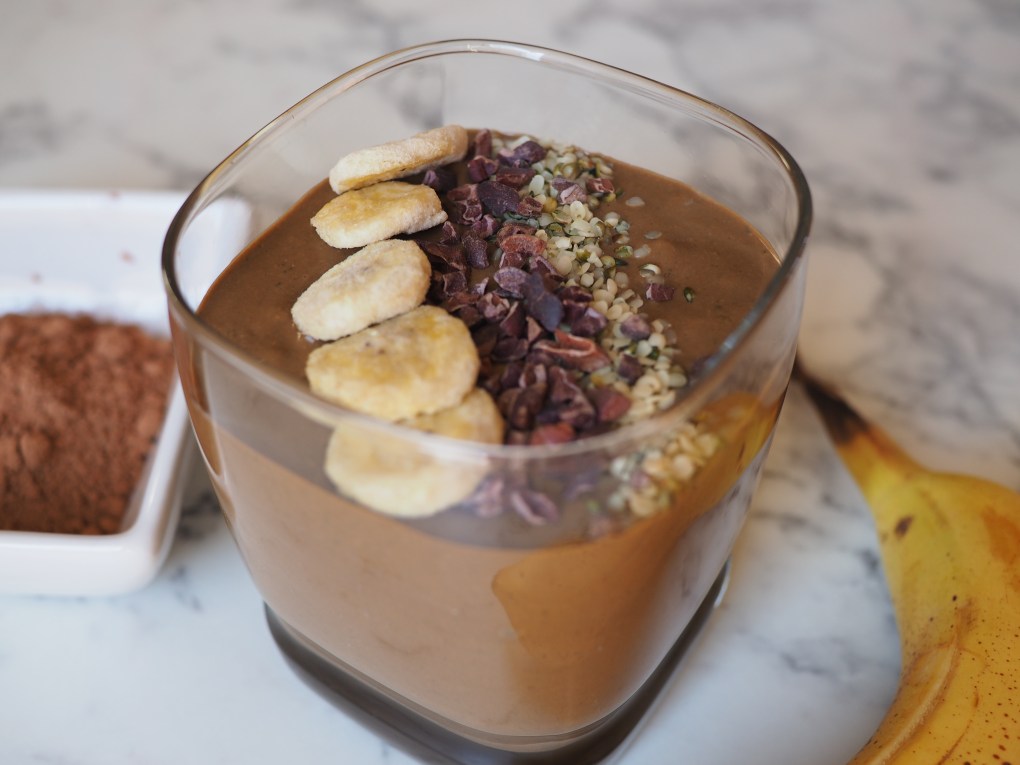
This smoothie rivals the likes of a chocolate shake, just with spinach and a heaping helping of unsweetened cocoa powder…two of the greatest superfoods on the planet. If you’ve followed my blog for any amount of time, you know that I make every effort to ensure that fiber, fat, and protein are blatantly added in every smoothie. This slows the digestion and absorption of nutrition. Without these, you truly would be drinking a milkshake.

  • Fiber= spinach (check!)
  • Fat= hemp seeds (check!)
  • Protein= peanut butter (check!)

OLYMPUS DIGITAL CAMERA

Chocolate Peanut Butter Smoothie

  • Servings: Four, 8oz servings
  • Difficulty: Easy
  • Print
/>

Ingredients

Chocolate Peanut Butter Smoothie

  • 1 1/4 cup sweetened almond, coconut, or oat milk
  • 2 cups spinach
  • 1/4 cup unsweetened cacao powder (I use Navitas Cacao powder)
  • 3 Tbsp hemp hearts*
  • 3 Tbsp peanut butter
  • 3 ripe bananas (fresh is fine, but I like the icy blend of frozen)
  • 1 Tbsp cacao nibs

*I love the creaminess that hemp hearts contribute to smoothies, but flaxseeds or chia seeds act as a good replacement if you don’t have hemp hearts around. They aren’t always easy to find. If you do find them, stock up!

Directions

Add all ingredients in the order given and blend! You may wish to blend the cacao nibs in with your smoothie or add them as a garnish on top. Or both!

Refrigerate left overs in sealed glass jars for up to 3 days or freeze for up to 3-6 months.

Photos and Content Copyright © Jaclyn Beaty Nutrition, 2019